Macs can operate in macOS Recovery Mode, which allows you to run emergency maintenance on your desktop or laptop. It’s a special mode that loads native recovery tools that help you restore from a Time Machine backup, get help online, reinstall macOS, or erase a hard disk and more. The recovery tools are loaded from a special disk partition holding a recovery image and copy of the macOS installer.
However, running an M1 (Apple Silicon) based Mac in Recovery Mode differs from running an Intel-based Mac. To use the mode, you must be connected to the Internet.
How to Start Your M1 Mac Up in Recovery Mode:
- Choose “Apple menu () > Shut Down”
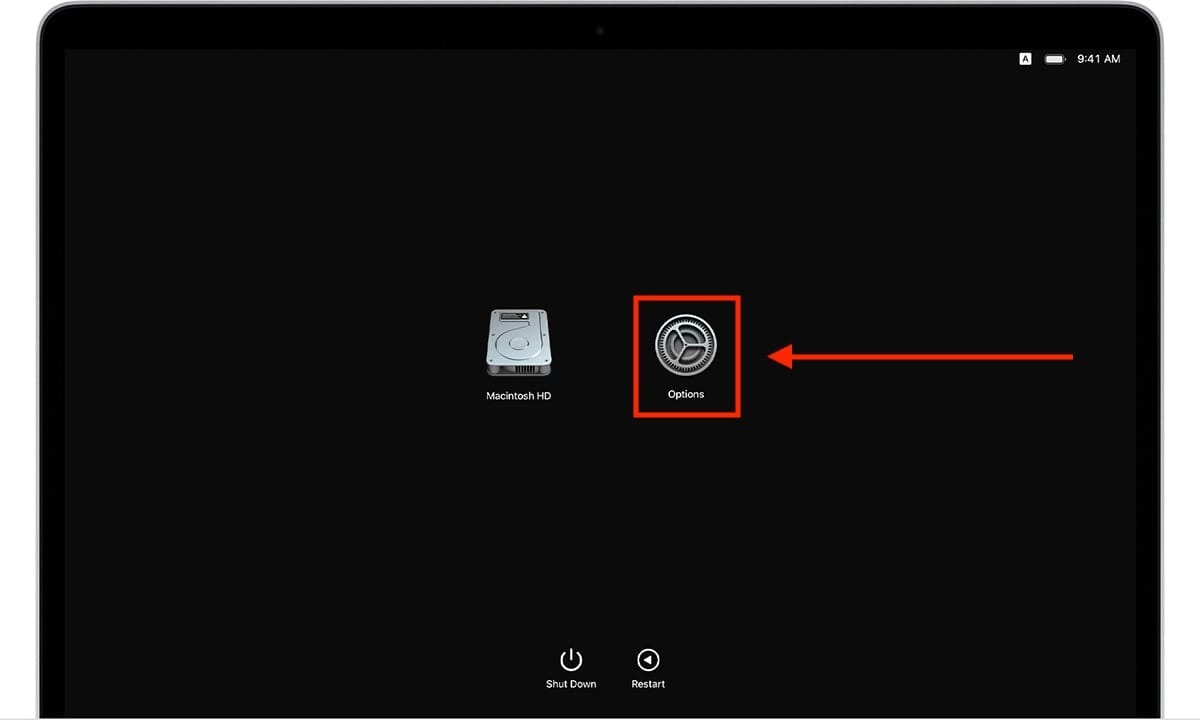
- Press and hold the power button on your Mac until you see “Loading startup options.”
- Click Options, then click Continue.

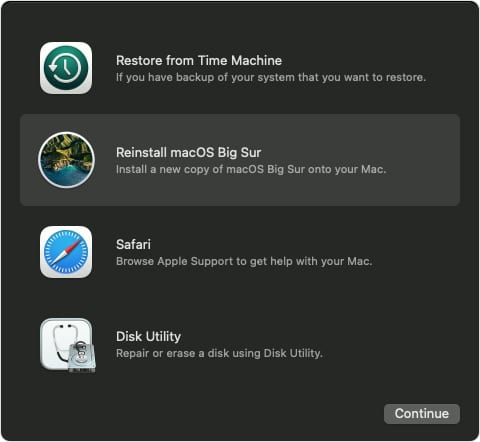
- If requested, enter the password for an administrator account. This will take you to the macOS Utilities screen.
ONCE BOOTED INTO MACOS RECOVERY MODE, YOU CAN PERFORM THE FOLLOWING FUNCTIONS:
- Recovery: The Recovery app provides access to additional apps in macOS Recovery.
- Time Machine System Restore: Restore your data from a Time Machine backup. In the Recovery app window, select Restore From Time Machine, then click Continue. To return to the Recovery app, choose “Time Machine System Restore > Quit Time Machine System Restore.”
- Install macOS: Reinstall macOS on your Mac. In the Recovery app window, select Reinstall macOS, then click Continue. To return to the Recovery app, choose “Install macOS Big Sur > Quit Install macOS.”

- Safari: In the Recovery app window, select Safari, then click Continue. To return to the Recovery app, choose “Safari > Quit Safari.” If you’re connected to the internet, you can use Safari to search for more information on the Apple Support website. Note that Safari browser plug-ins and extensions are disabled in macOS Recovery.
- Disk Utility: Repair or erase your disk. Use this one with care! In the Recovery app window, select Disk Utility, then click Continue. To return to the Recovery app, choose “Disk Utility > Quit Disk Utility.”
- Startup Security Utility: Set the security procedures for your Mac. In the Recovery app, choose Utilities > Startup Security Utility. To return to the Recovery app, choose “Startup Security Utility > Quit Startup Security Utility.”
- Terminal: Change settings via the command line. In the Recovery app window, choose Utilities > Terminal. To return to the Recovery app, choose “Terminal > Quit Terminal.”
- Share Disk: Share the disk of a Mac that’s started up in macOS Recovery. In the Recovery app, choose “Utilities > Share Disk.”
- Startup Disk: Set the startup disk for the Mac. Choose “Apple menu () > Startup Disk.” To quit the app, choose Startup Disk > Quit Startup Disk.
“Fallback recovery OS”
If macOS Recovery Mode didn’t solve your problems, you can give “Fallback recovery OS” a try. It’s the same process as recoveryOS boot, except that it boots to a second copy of recoveryOS that, in Apple’s words, “is kept for resiliency.”
However, it won’t allow you to change the system security state — which most of us probably shouldn’t mess with anyway. From a shutdown state, double-press and hold the power button to boot into Fallback recovery OS.
macOS Recovery Mode on an Intel-based Mac
To use macOS Recovery on an Intel-based Mac, hold down Command (⌘)-R on your keyboard immediately after restarting your Mac or immediately after your Mac begins to restart. Continue holding the keys down until you see the Apple logo or a spinning globe. Startup is complete when you see the utilities window.
You may have to enter a password, such as a firmware password or the password of the user who’s an administrator of the Mac. A firmware password prevents starting up from any internal or external storage device other than the startup disk you’ve selected. If you don’t recall setting up such a password, well, you probably didn’t.
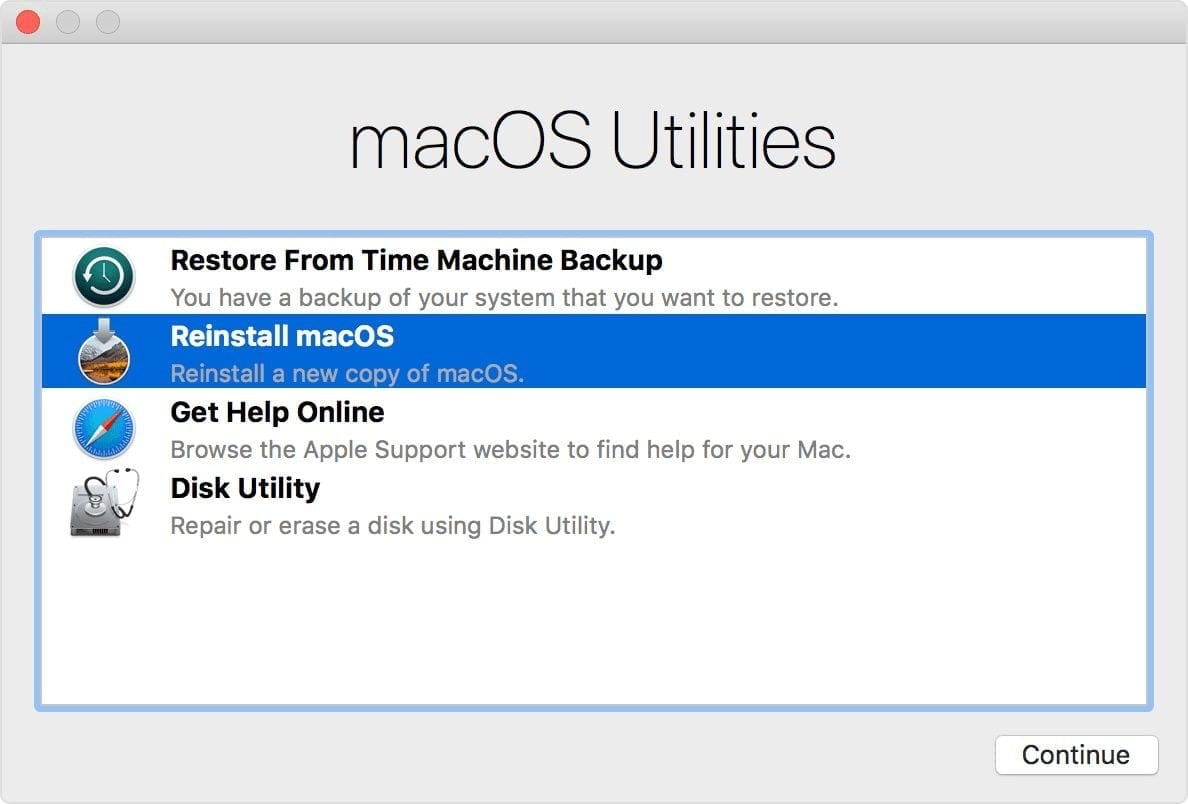
After entering any required passwords, the macOS Utilities window should appear.
YOU’LL HAVE FOUR OPTIONS:
- Restore From Time Machine Backup
- Reinstall macOS
- Get Help Online
- Disk Utility

Source: eshop.macsales.com

