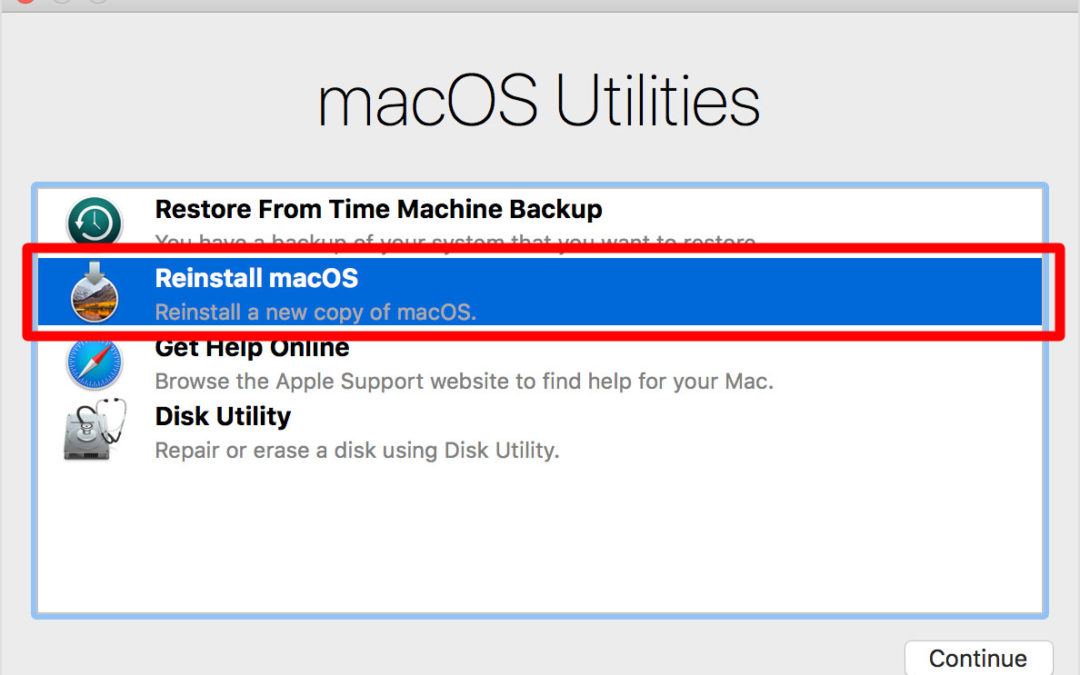
Here’s how to restore a Mac by reinstalling macOS via the internet using macOS Utilities and Recovery mode.

There are a few reasons why you might want to reinstall macOS (or even Mac OS X). Perhaps your Mac is working erratically and you think that a clean install of the operating system might fix the issue.
Alternatively, you might be planning on selling your Mac, or passing it on to a member of the family (in which case, you need to wipe it first and return your Mac to factory settings).
It is even possible to reinstall the version of the macOS that your Mac shipped with – which might enable you to revert to an older version of the operating system if the latest version is upsetting you.
Whatever your reason to reinstall macOS, we will show you one of the simplest ways to do so below.
Our method involves using the Recovery partition via which you can reinstall the latest version of the macOS you installed on your Mac. Because macOS is normally installed via Software Update (or previously the Mac App Store) there are no physical installation disks, therefore Apple has made it possible to install the operating system over the internet using the Recovery HD.
An alternative option would be to create a bootable macOS install on an external drive. If your Mac doesn’t boot in Recovery mode, read this: Mac can’t access Recovery mode.
You might also find this useful: How to do a clean install of macOS using a bootable drive.
How to reinstall macOS via Recovery
At a glance
- Tools required: A back up (if you will be wiping the Mac), an Internet connection, a network with WEP or WPA security
1.
Back up your Mac
If you are planning to wipe your Mac as part of this process (either because you think that a clean slate might fix issues you are having, or because you are selling the Mac) you may want to back up your important documents first.
How you do this will depend on whether you want to recover your Mac into the same version of the Mac operating system, or if you were hoping to do a clean install. For example, if you want to revert to an older version of macOS you don’t want to back up using Time Machine. For more advice read: How to back up a Mac and Best Mac back up software.
Note, if you tend to use iCloud Drive to sync all your Documents and Desktop in the cloud you may find you don’t need a backup, but make sure that everything is in iCloud before you delete!2.
Erase your drive (M1 and M2-series Macs)
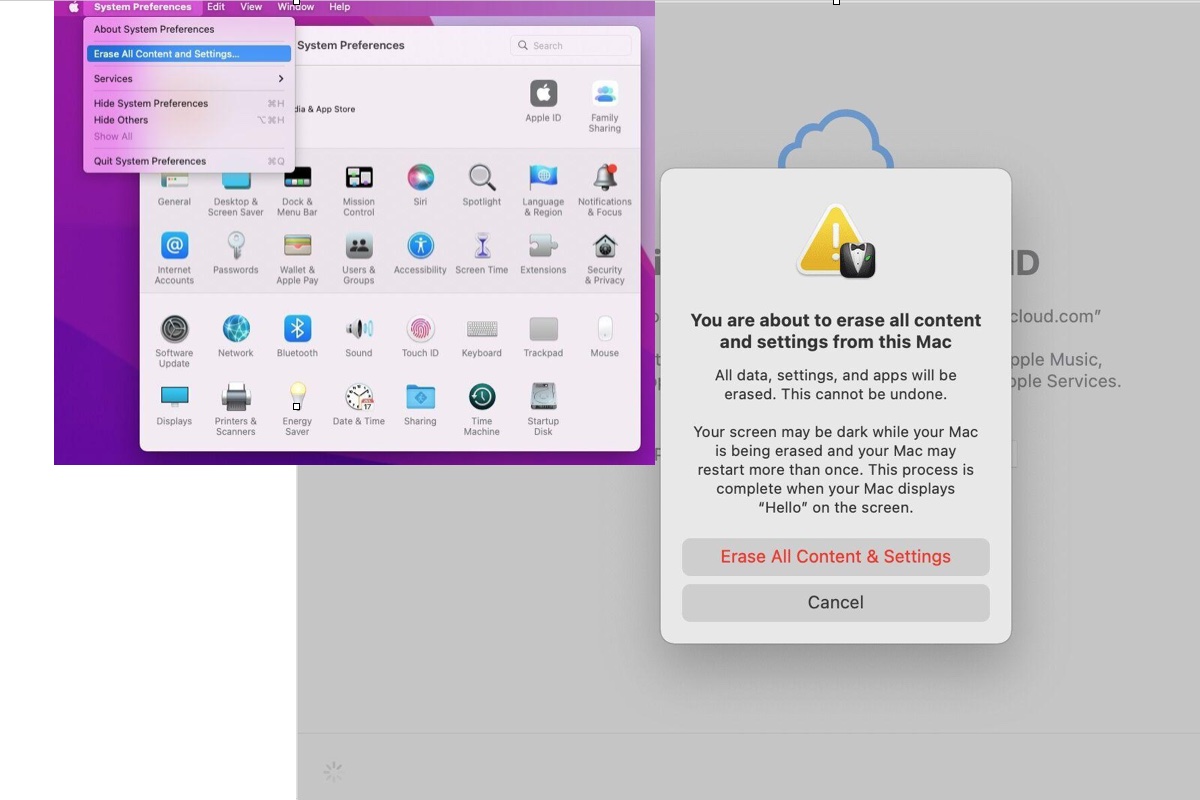
If you are planning to sell or pass on your Mac, or you want to do a clean install of macOS to solve issues with your Mac, you will want to erase your hard drive before reinstalling the operating system.
If you are running macOS Monterey or a later version of macOS on a Mac with an M-series chip, or an Intel-powered Mac with a T2 chip (some Macs since 2018), there is a very simple way to erase your Mac that doesn’t require you to use Recovery mode and Disk Utilities. If you have an Intel Mac you will need to work through the steps below to erase your disk before you can begin.
We detail how to erase your Mac using this method in a separate article, but here is a summary:
In Ventura or later:
- Open System Settings.
- Click on General.
- Choose Transfer or Reset.
- Select Erase All Content and Settings.
- Enter your password
In Monterey:
- Open System Preferences.
- Click on System Preferences in the menu bar at the top of your screen.
- Click on Erase All Content and Settings.
- Enter your password.
The rest of the process is the same:
- You’ll be reminded to do a backup with Time Machine before you begin deletion–but you can skip that step.
- A window will show you what will be deleted, including Apple ID, Touch ID, accessories, and Find My settings.
- Finally you will need to log out of your Mac and all related services using your Apple ID.
- Before your Mac is erased you receive a final warning, so if you have second thoughts at least you can stop at this point!
- Having clicked the second Erase All Content & Settings your Mac will restart. Eventually you will see a black screen while it restarts.
- Once your Mac restarts you can go through the steps to set it up as new, or you can leave it at this stage for the next owner to set up. Just turn the Mac off first.
Unfortunately if your Mac doesn’t have Monterey installed or doesn’t have a T2 or M-series chip then you need to use Disk Utility to delete your Mac. Follow the next two steps to do that…
If you have already erased your Mac the next step will show you how to enter Recovery mode.3.
Enter Recovery mode
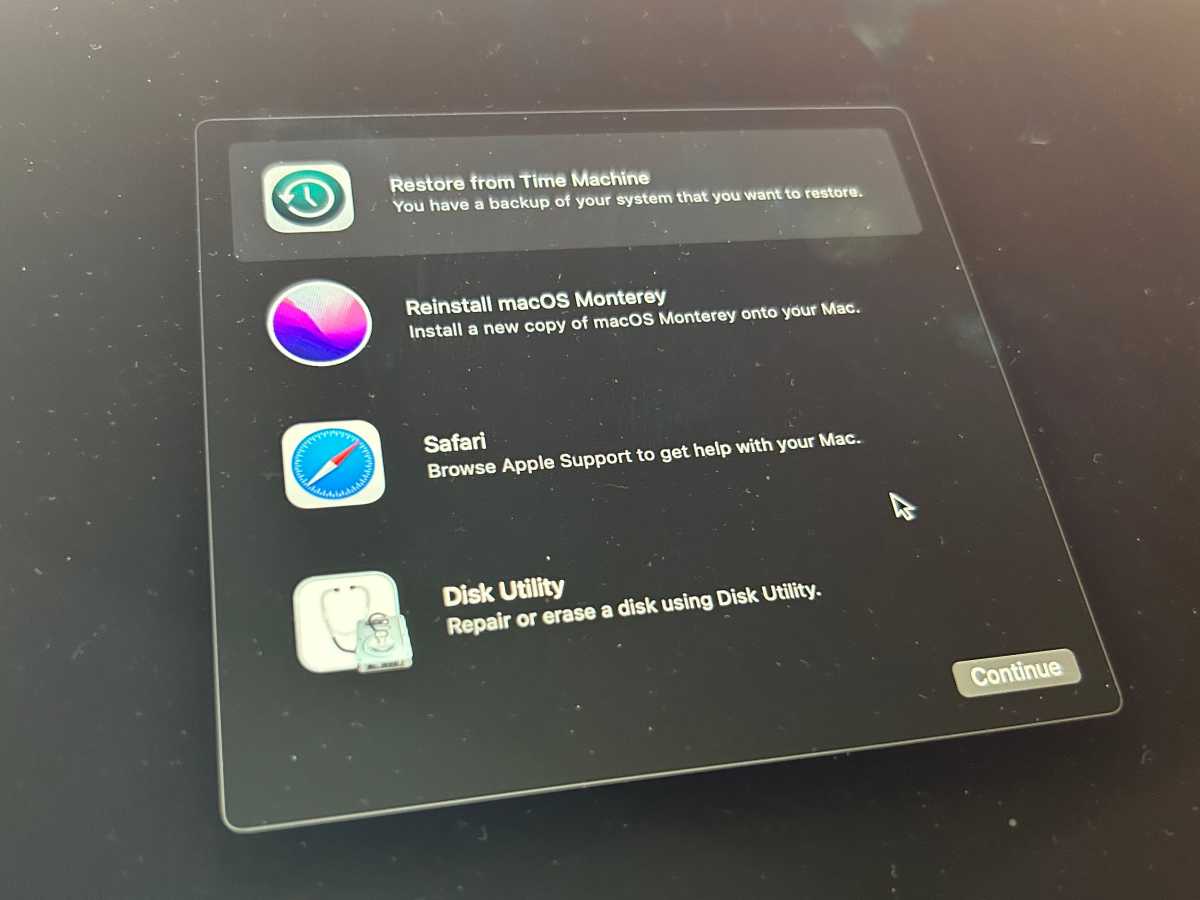
The process for entering Recovery mode depends on the Mac you are using.
On a Mac with an Intel processor you need to press and hold the Command and R buttons during start up until you hear the startup chime and see either a spinning globe or Apple logo.
On a Mac that use Apple’s own processors, such as the M1 or M2 chip, you enter Recovery mode by pressing and holding the power button while your Mac starts up and continue to press and hold the button until you see a startup options window appear with an Options icon. Then select Options and click Continue.
A macOS Utilities window will open, like the one above, on which you will see the options to Restore From Time Machine Backup, Reinstall macOS [version], Safari (or Get Help Online in older versions) and Disk Utility. Your next step depends on whether you need to wipe the Mac before reinstalling the operating system. If you want to wipe your disk click Disk Utility (otherwise you can skip the next step).4.
Erase your hard drive (Intel Macs without T2 chip)
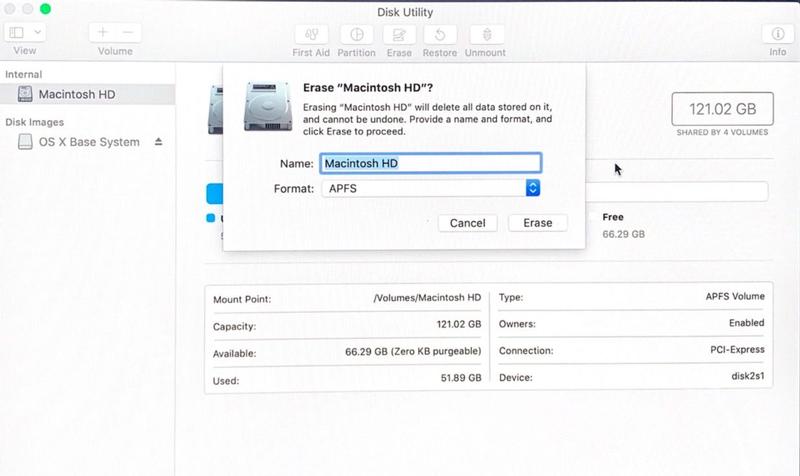
If you have a Mac with an Intel processor that doesn’t also have a T2 chip you can delete your Mac’s hard drive using Disk Utility accessed via Recovery mode (you have to access the drive via Recovery because it’s not possible to delete the drive when you are accessing it).
- Select Disk Utility from the options in Recovery mode.
- Now select the volume you wish to Erase. You may need to click on View > Show All Drives before you can see the volume. Note that the process here is slightly different if you are running macOS Catalina or Big Sur. If you aren’t running Catalina then you only need to delete the Macintosh HD volume. If you are running Catalina or later there will be two volumes probably called Macintosh HD and Macintosh HD-Data (or possibly Home and Home – Data). You’ll need to delete the Data volume first and then Macintosh HD. We cover how to do this here: How to wipe and reformat your Mac. Remember this is going to delete all your data so make sure you have your important data backed up or stored in the cloud or on an external drive.
- The next step also depends on the version of macOS you are running. In Catalina, Mojave, Big Sur, Monterey, and potentially High Sierra (depending on your Mac) this will be APFS. But on older Macs running older macOS versions the format needs to be set to Mac OS Extended (Journaled). You will also need to have GUID Partition Table selected as the Scheme. (You won’t see the Scheme option if you only have the volume selected).
- Click Erase and wait. (There are options under Security Options that allow you to erase the disk securely).
- Now choose Disk Utility > Quit Disk Utility. Or just Command + Q.
5.
Reinstall macOS
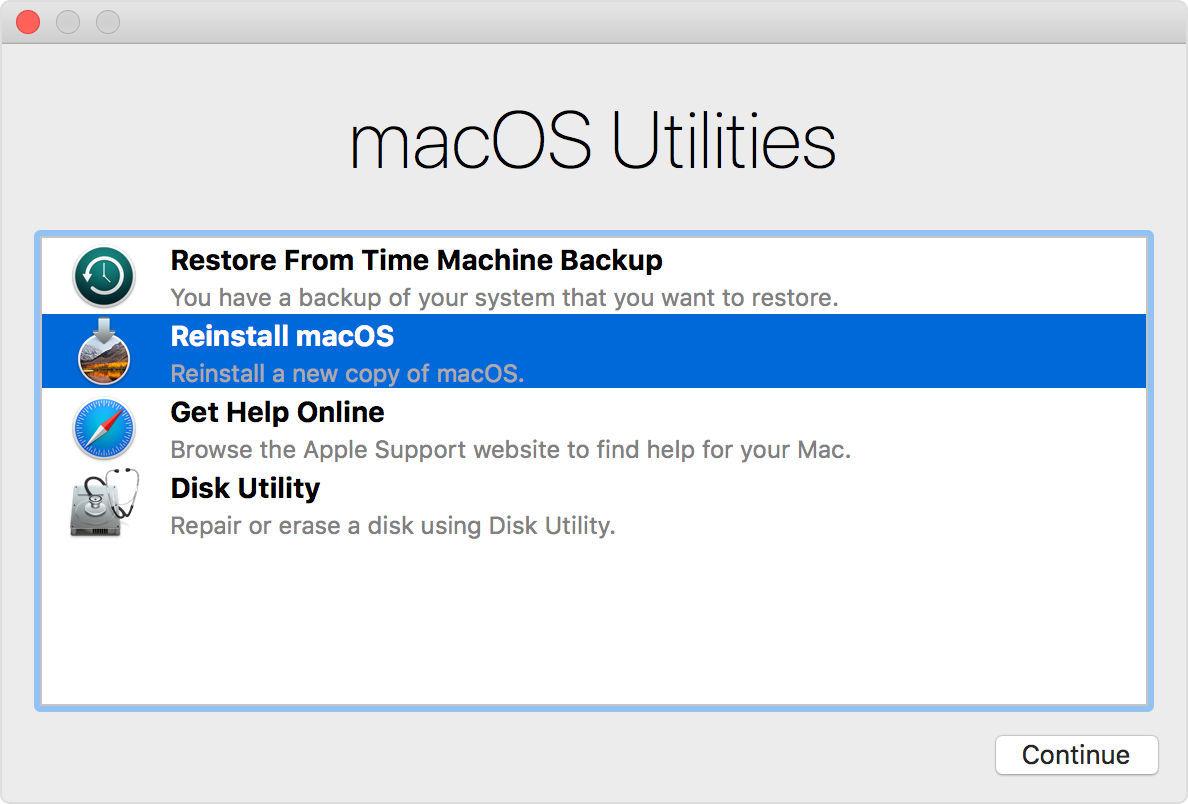
Follow these steps to reinstall the latest version of macOS installed on your Mac:
- Return to Recovery and choose Reinstall macOS from the list of options.
- Click on Continue.
- Enter your Apple ID if required and wait while macOS is reinstalled. Expect this to take a while.
- If you are intending to sell or pass on the Mac so that the next owner can enter their own details, when the setup wizard starts up quit. Otherwise follow the instructions to continue setting up your Mac.
How to reinstall an older version of macOS
If you want to revert to an older version of macOS, perhaps because you aren’t keen on the newest version you have installed there are a few ways to reinstall an older version. We cover them separately here: How to install older versions of macOS or OS X.6.
How to connect to the internet in macOS Recovery mode
To reinstall macOS using Recovery mode you have to connect to the internet. Follow these steps to connect to the internet in Recovery mode if your Mac hasn’t automatically connected:
- Click the Wi-Fi menu in the upper-right corner of the screen.
- Select a Wi-Fi network.
- Enter the Wi-Fi password (if required).
Recovery mode should now be connected to the internet and be able to download the macOS installation software.
If you are using Internet recovery you’ll need to be using a network with WEP or WPA security. This shouldn’t be an issue as most home Wi-Fi networks do, but if you’re on a proxy network or PPPoE then you will have problems.
Source : macworld.com

